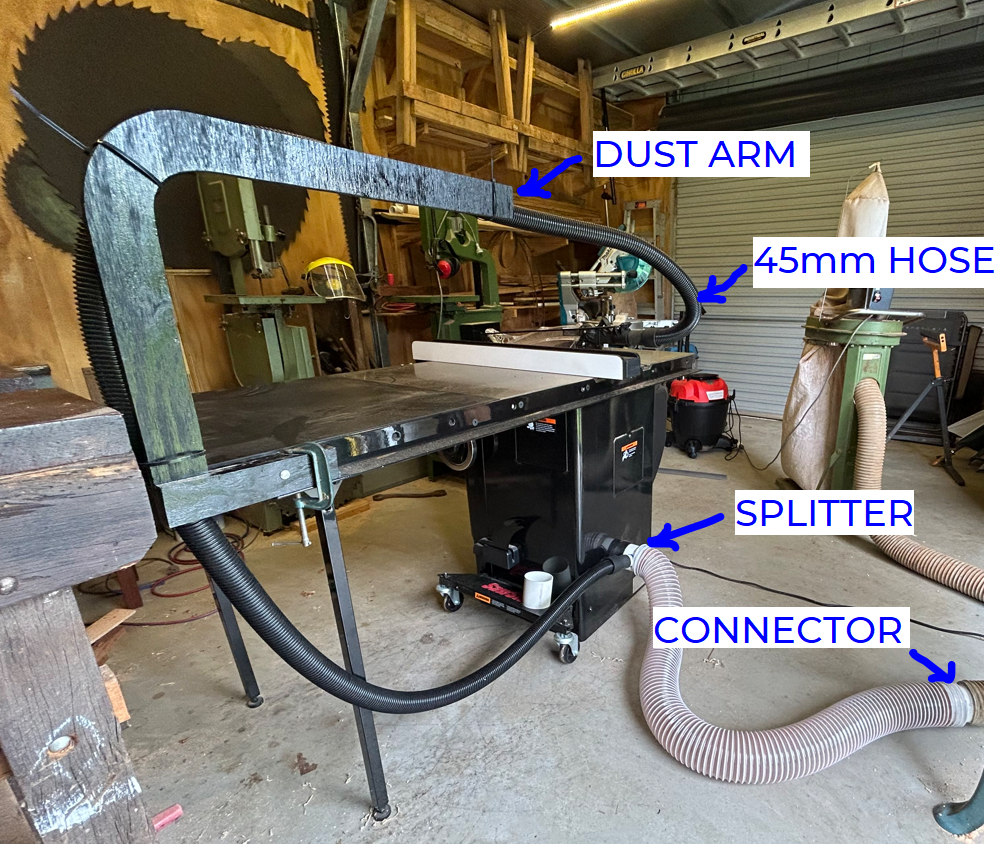
2x 1.5″ Hose Connectors from Sawstop – $25 bucks TSA-ODC-011 USD: $5.85 https://www.carbatec.com.au/ (You probably could find cheaper on ebay ) (make sure it can fit a hose with 45mm outer diameter)
Black spray paint (I would put some sort of finish on it)
Alternative Part
SawStop Dust Collection Arm – $440 SST-TSAODC USD: $296 (SawStop philosophy if you can afford the saw – you can afford this piece of plastic)
Thanks
If you have read this far and are thinking of making your own, please let me know by leaving a comment on the video. It is people like yourself that make my YouTube channel worth while.
if you’re interested in making a chess board, you’re in
the right place.
I used ironbark and cypress for the two contrasting colours
First cut it into strips the same width as the chess board
squares.
and here’s a lookup table if you want to calculate your
own.
My square size has been made 1.5 inch I don’t have plans for the actual board because your square sizes will probably be different. Apart from measuring the square sizes, the dimensions of the other parts are relative. Meaning that you measure and cut the inlay and frame to fit as I did in the video
Most chess boards have a lighter colored strip for the thin inlay and darker wood for the frame. But I had what had and it still looks pretty good.
Believe me – if you have enough wood and you think you might like two boards make two at once, it is heaps quicker.
Cut the length of the strips using this formula
8 x the width of the strips + 7 x the width of the saw blade. + A little bit more ~ ¼ inch that you trim off.
I show you how to glue it together – pretty simple
Then you cut it across the grain to make new strips (exactly the same width) I made a fancy gig, but a table saw is what most people use for this step.
Flip every second strip so you get a checker board pattern and glue it again.
As I point out in the video, the game is always played with the white square in the bottom right, so keep that in mind if you want the grain pattern horizontal or vertical on the board in relation to the player.
Now if you were careful with the glue up, the edges will be flush, but it is likely that the edge will not be perfect. I touched mine up with a sharp hand plane. You need this perfectly flat to glue on the inlay strip.
If you have access to a drum sander machine then you know
what to do, I don’t and found a sharp hand plane more than adequate to flatten
the top.
Now add the inlay. You could skip this step but the board
just does not look right without it.
At this point the board looks square but I can tell you it will be slightly out. You have to custom cut each length of the inlay strip to fit seamlessly.
i.e you can’t just cut 4 strips the same length and expect the
mitre joints to fit.
If you are not comfortable with cutting little mitres, use the butt joint method instead. It is not as visually pleasing but you can get away with it.
Repeat this process custom fitting the main frame.
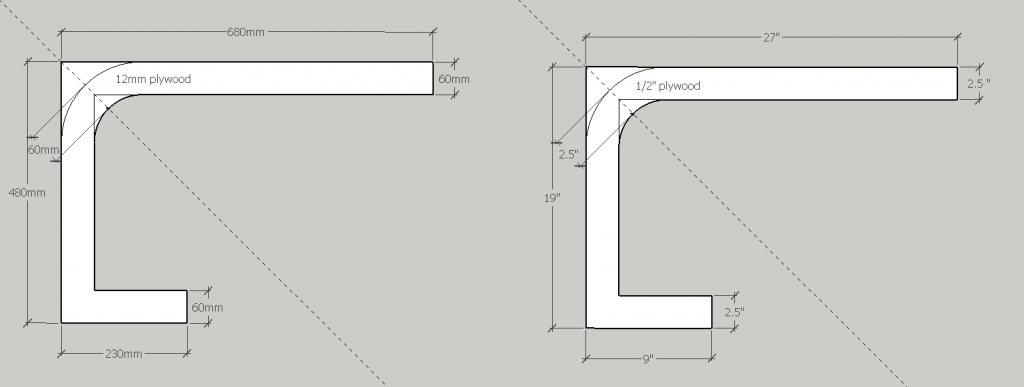
I cut this frame about 45mm square and that leaves a decent space under the board which I later turn into storage for the pieces.
I used splines in the
video to strengthen the frame and then put a chamfer around the edge
I had some 4mm thick plyboard and installed it into a rebate/rabbet as a flush fitting base.
Apart from applying some finish, that is it for the chess board. !!! Finished !!!
The underneath storage and latch mechanism
Now we make and install the secret latch mechanism and
underneath storage
I obviously did heaps of research and was looking for a simple latch to use in my project but could not find exactly what I wanted.
At this point I decided I could make it with brass and found some suitable materials on line. 1 inch by ¼ inch brass bar and 1mm thick brass plate. I fully designed it myself in the 3d modelling program Sketchup which free to download and use.
Click here for the model if you want to have a play or modify it. The plans above are screen prints from this model.
If I did it again I would again pick a piece of wood with a knots
and position it in the centre like I did here.
Or you could use your imagination and fashion some sort of push button.
Cut out the latch parts and clean them up.
I believe you can use normal low melting point soft solder commonly used for electronics 60% lead 40%tin
I used silver solder which is normally 65% silver. 20% copper. 15% zinc. and costs over a $100 bucks for 4 rods.
I used some cheap rods with only 5% silver And Bossweld Silver Brazing Flux .
I don’t know any better, but it worked pretty good in the end.
I made a point in the video about using wax on the screw threads but what I didn’t mention was that brass screws are fragile. They snap and need that little bit of lubrication.
If you have a steel screw the same size, use that to cut the thread in the hole first or be careful not to put to much pressure on it when driving in.
I next show you how to make a pin for the spring. This is so that when the spring is compressed it does not deform in shape. Just makes it work better.
The spring came from my local hardware and interestingly even though we are fully metric here in Australia for decades, you can still buy parts with imperial measurements. The spring is 3/16 wide which makes it perfect to push my 1/4 inch wide brass latch with out catching the sides of the slot.
Position the hook part of the latch dead center and mark the position for future reference.
Clamp the sliding latch in the open position so you can measure and make the stop block.
I then show you in the video how to work out the depth of a cutout in this block for the spring
Keep in mind the latch heeds 6mm travel to open and close and enough pressure from the spring to keep it closed.
The other half of the latch is the push bar slider. It needs to be the same thickness as the brass latch so it does not bind and also has to be cut to a specific length. (to stop the slider in the closed position)
Move the latch slider into the closed position and this is length you need to cut the push bar
Cut a recess for the top plate, it looks so much better if it
fits flush.
Now the catch needs to be attached to the base. This is pretty much impossible without the double sided tape trick I showed you in the video.
Then glue it on with epoxy.
The next part I get creative with turning that old drill bit into something cool by soldering on an old key and then make a custom recessed key holder. Having some magnets on hand for projects like this is really handy and you really cant make a holder like this without them.
The next step I skimmed over the first bit of making boxes for the chest pieces You cant see it with the eye but both boxes are different sizes and not perfectly square and need to be custom fit to the under board receptacle .
This is because the knot which I used to hide my hole was not exactly centre after all and I had to positioned the latch mechanism over it.
It took a little fiddling and then I shimmed the box in place so there was an even surround all the way around the boxes. It worked out great for me but you definitely can leave a bigger gap to be safer.
Once again you need the double sided tape trick to transfer the position of these boxes onto the base and then glue it permanently in place and I show you my technique in the video.
The boxes can then be used in place as a fixed framework to install the dividers for the chess pieces.
Finish with shellac or use your finish of choice.
I spent a lot of time documenting this so hope it was inspiring for you at least. If you have any questions please post on the video comments section and if you feel inclined to give me a hi5 then press my YouTube subscribe button.
This is a very detailed guide, along with demonstration videos that show you how to make this small wooden horn block plane.
I first restored a vintage version here and then made a prototype, then designed an even better version with a unique sliding dovetail body and made 3 of them, so this guide is definitely not half baked.
I am more than happy to answer all questions on YouTube in the video comments.
Video Part 1
Make the Sliding Dovetail Plane Body
You need 2 pieces of hardwood approximately 150 mm long. (for one plane body)
Exact dimensions are in the plans, note you need to start with a longer pieces so you can square the ends.
I used a length of merbau fence railing because it is cheap and incredibly hard and durable.
Due to the majority of operations being machined, it is safer if the length is longer and I suggest at least 300 mm so you can make two at once.
I thought I could stuff
one up so used 450mm and made three planes in one go.
The plans assume you have
a 4mm thick saw blade and you must ensure the saw blade is accurately set to
90degrees before starting
Cut the right hand side first
This is the pin side. (The male part of the dovetail)
Looking from the front,
the right hand side needs to be machined
28mm wide or
a bit more if you want a deeper dovetail.
60-70mm high
(allowing for supportive material to be left behind for future steps)
The “exact” position and size of the dovetail is not critical as the block can be trimmed to final position it.
From the front it looks best if positioned in the center of the nose but make sure it is no less than 10mm from the bottom so that it looks good inside the mouth.
With a dovetail bit in a
router, cut up to the bottom of the pin
Then using the dovetail
bit, same depth, cut the top of the pin and hog out the material above it.
This part with the pin should still have the excess material at the top left over to use as support.
Cut the left hand side next
This is the tail side. (The female part of the dovetail)
Looking from the front,
the left hand side needs to be machined
23mm wide
(allowing .5mm for sanding and clean-up)
At least 50mm
high (allowing for cut to size)
Position the dovetail tail in a spot that allows the top and bottom of the left hand plane body to be trimmed to match the pin side.
This joint needs to be
tight so take several passes with the router and creep up on the final cut.
The two halves should
push together and bind a bit. If it is a little loose, the gaps can be hidden
with glue but if it freely slides or wobbles, then you will need to consider
cutting another one.
Cut out the internals
Cut the internal dimensions of the plane.
Set the saw blade to cut 16.5mm into the work piece for the left hand side and for the right hand side 16.5mm + the thickness of the dovetail. The right hand side will need support under the piece because of the protruding dovetail. If this is not possible to safely cut then consider making these cuts before cutting the dovetail.
Refer to the plans and measure 62mm from the front of the plane and make a 64degree cut, use a guide jig or mitre gauge. (Remember, we will trim both ends of the plane so scribe a reference line in a bit and measure from that, you can see these lines in the first video @ 3:18)
Then make a 90degree cut
60mm from the front of the plane.
This forms a little wall
at the front of the mouth. It should be about 6 – 10mm high and can be filed
back later if the mouth needs to be widened.
Then make a 45degree cut
for the iron’s bed.
Line up the saw blade so
that it cuts as close to the front of the mouth as possible without actually
touching.
This makes about a 7mm
wide mouth.
Then transfer the cut
marks to the other side of the plane and repeat.
Note from this point
onward, the bed is the reference surface and everything else needs to be fine
adjusted around it as necessary.
As per the video, scribe a line on the top of the plane to ensure the next step produces a clean and square result. @ 3:34
Chisel out the waste
between the saw cuts using the scribe line as a reference to keep the opening
straight and square.
—–
Make the hollowed out wooden dowel
You could use just the brass pin but it has less surface area to lock in the wedge.
Also the wooden roller adds to the aesthetic appeal of the tool. The roller rotates to ensure a flat surface presses against the wedge and makes it more solid.
Cut the blank to oversized dimensions and drill a 6mm hole through middle.
Using the hole as a center, reduce to 12mm diameter in the lathe.
Flatten one side down to
about 2mm thickness from the hole.
Cut to length (a bit over size is safer at this point) I filed mine down to exactly fit the plane it was made for. Be careful to file into it so as to not splinter it. You could also use a sander.
—–
Finish the Body
Label the plane halves (to keep them a matching left and right pair) and rough cut them off.
You should now have 2 or
3 plane body blanks.
If all goes well, the internal cuts on both sides exactly match, but if not the important thing is that the 45 degree cut (the bed for iron) is lined up and the alignment of the front cuts can be finessed later with a chisel.
Chisel out the internal waste and sand etc., careful not to damage or alter the 45 degree surface as this has to be perfectly flat for the iron.
Line up the bed surface halves perfectly flush (use touch not eye)
Glue both sides together, if your wood is oily and dense, then first clean with spirits. A good choice of glues is be epoxy as it fills gaps
The sliding dovetail
joint should be a tight fit, if not it will need to be clamped during glue up
Mark out the hole for the
wedge pin and drill it all the way through.
Because the insides have
been chiselled out, the drill could blow out the internal wall so pack out the
centre opening with scrap wood.
Use a drill press to
ensure the hole is drilled parallel.
Check the flattened and
hollowed out dowel fits perfectly snug and can rotate.
Glue in the brass rod
securing the dowel. The dowel should end up tight but rotate freely.
Be careful not to get any
glue on parts that will bind the roller.
After glue is cured, you
can:-
Sand down the brass pins
Clean up the front wall in case the halves are
off centre (make sure it looks parallel)
Trim off the front and rear ends of the body to
make the plane body 140mm long
Cut the 15mm square front ledge
—–
Make the front horn
The front horn is a
dovetail fit and only looks complicated
The trick is to first cut the blank to size using the template.
This template can be
printed out to scale using SketchUp or use the measurements.
Mark out the side profile
and chisel away the wood to reveal the pin.
The important thing is to keep the parts that contact the plane square. The pin itself can be any wedge shape and at this point it is not critical because the tail part of the dovetail needs to be finessed to match this.
Draw a 12mm circle on the
top, where the horn peaks.
File and rasp away the
waste, blending the curves to the top circle.
Sand smooth
—–
Video Part 2
—–
Fitting the front horn.
Place the horn on the
centre of the top ledge and press down.
Scribe the outline with a
marking knife
Cut down and hollow out a
recess for dovetail
Sneak up on the joint focusing on the top where it inserts. Then when it is a tight fit, clean the hole all the way to the bottom keeping the walls parallel.
The internal corners of
the parts can be paired away so they sits snug together.
Check it sits flush and square and lock it in place with glue.
I demonstrate this
clearly in the video.
—–
Make the blade (Iron)
I used 3mm (O1 tool steel) which is readily available from places like RS components. The o in O1 stands for Oil, meaning this steel is to be quenched in oil as part of the hardening process. O1 tool steel is reasonably priced so in the end each blade only cost about $10 and it is super easy to work, and you pretty much are guaranteed a good result.
The width of the plane interior is 33mm so cut the iron width just under that, (~32mm)
Cut the blade length and
square it up.
Round off top corners to
taste.
Grind a 25degree bevel
Harden
Temper
Sharpen
Done
All these steps are shown in the video.
—–
Make the wedge
Assuming the plane is
made to exact dimensions, follow the dimensions in the plan.
However the dimension will need fine tuning to ensure the blade is firmly held, so essentially the wedge is custom made to fit *this* plane.
Cut the wedge to thickness (so it just cant fit under the roller) then add the taper that the roller pin rides against.
The important thing is to
sneak up on the fit (I demonstrate this in the video)
Ensure the top face of the wedge sits flat on the roller (I used a feeler gauge to monitor this as I made it)
I added a rounded over
block on the top of the wedge which is visually pleasing and gives a bigger
target for the hammer.
Make the point of the
wedge sharp because we don’t have a chip breaker but also make this angle not
too acute and fragile.
When the wedge is final size, this tip should be about 1cm from the tip of the iron
—–
Add chamfers and round over details.
Round over the rear of
the plane body so it sits nice on the hand.
Round over the top sides
of the plane to the same degree.
Add 45degree chamfer on
the four corners,
In the video I used a file with two pieces of wood as a file guide.
Give your plane a final sand.
—–
Assemble, finish, and sharpen
Apply your favourite
finish, I recommend a traditional finish –
Boiled
linseed oil and completely wipe off excess
Wait a day
and then shellac.
Then finally
some wax.
Ensure the blade is honed
razor sharp.
I showed the steps how I sharpened my blade but my main tip is to first get the back of the blade polished first as this is the actual cutting edge.
And second tip, even
though the O1 tool steel was milled from the factory, the back still needs
smoothing and it is easier to smooth before the hardening step.
I used a 25 degree bevel then a 30 degree micro bevel on the very edge tip during final sharpening. But use your favorite sharpening technique and blade geometry or feel free to do some further research because this is a topic that everyone has a better method but essentially it comes down to what hardware you have to do the sharpening.
—–
Tune test
The iron is placed bevel
down
The video demonstrates how to bang the back to release the iron and make a lighter cut and to tap the iron to make a deeper cut.
The wedge should be firm
but not too tight.
Chips should not jam in
the mouth or on the wedge
If the mouth needs to be widened, take into consideration that the smallest gap is best and you can’t make it smaller later. Also if you need to flatten the sole, then this widens the mouth over time.
The end of the wedge should be about 1 cm from the iron tip, if you notice it is jamming in this area then sand it back a bit.
Add a drop of machine oil
on the blade to prevent corrosion.
—–
Finally
Share pictures of your creation, you can find and tag me using the social media icons at the bottom of the page and I will enthusiastically check it out and congratulate you.
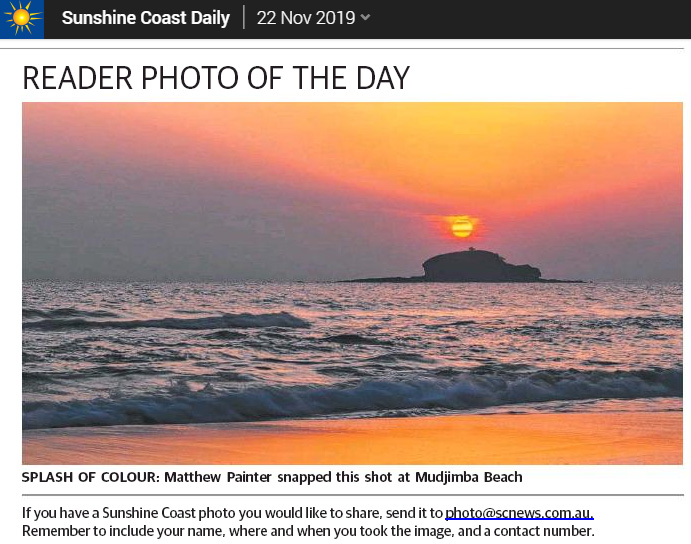
I planned to turn up at Mudjimba beach on sunrise last weekend because we were having a low tide (best for photos) and just because it is about time I got back into the hobby.
I positioned myself inline with Old Woman Island and where the sun was going to come over the horizon. My first photo was at 4:51am and the light was quite drab. It was not until 5am (well after sunrise ) that the sky started to illuminate and look interesting.
At that point I realised that this was going to be a very different sunrise. The smoke haze from the recent bush fires was well out to sea and over the horizon. When the sun started to crest over the island it was a dull red disk. Normally you can only get this effect with a camera’s ND filter, my filter today was nature.
To add to the effect there was one squiggly cloud just over the island, making it look like the island itself was in steaming lava. There were only a few people on the beach and this guy came up to me and said, “Wow, I have never seen that before, could I have a photo?” I got his email address and sent him a couple.
Knowing I was onto something, I sent a couple to the Sunshine Coast Daily and one got published as “Reader Photo of the Day”.
I also sent some to Sunshine Coast Council and a photo got featured on their Facebook Banner.
I just setup this website using the Google Cloud Platform and was surprised how cheap and easy it was. If you are interested in the nuts and bolts of it, below are the tutorials I followed.
1. This article by the guru Chris Titus is what won me over to the Google Cloud Platform.
Chris clearly steps you through setting up a Server hosted in the cloud and shortly thereafter *bam*, you have a website. Chris says free hosting forever… but the reality is about $4/month after the first year of free credit is used up.
2. Follow this article by One page Zen and your site has https:// for free.
https:// typically requires paying for an SSL certificate and having IT Ninja abilities, but that step was a breeze too.
The hardest and most time consuming part is configuring the WordPress look and feel, so being familiar with the platform helps.